How to digitise film negatives using a DSLR
I love taking photos on film and the anticipation of seeing how they turned out. I get my films developed at ASDA Gosforth because it's good value at £2.50 a roll and the results are good enough for my purposes. I'll often get the images scanned onto a CD for an addition £2 for convenience but I choose not to get prints because I like to view and edit my photos first.
The digitised images on the CD are normally low res jpegs and are only really useful as a digital contact sheet. They are not high res enough to print and too compressed to properly edit. The printer's do their best to make sure that the images come out looking decent but they don't always output them the way you had in your mind, as shown below. Scanning the negatives is the logical step to get to high-res images that I can edit but I do not have access to a good negative scanner. Cheap scanners do seem to exist but online reviews suggest that you get what you pay for and until you start forking out the big bucks, it's not really worth it.
The JPEG on the CD has been auto corrected and as a result, the sky is too bright.
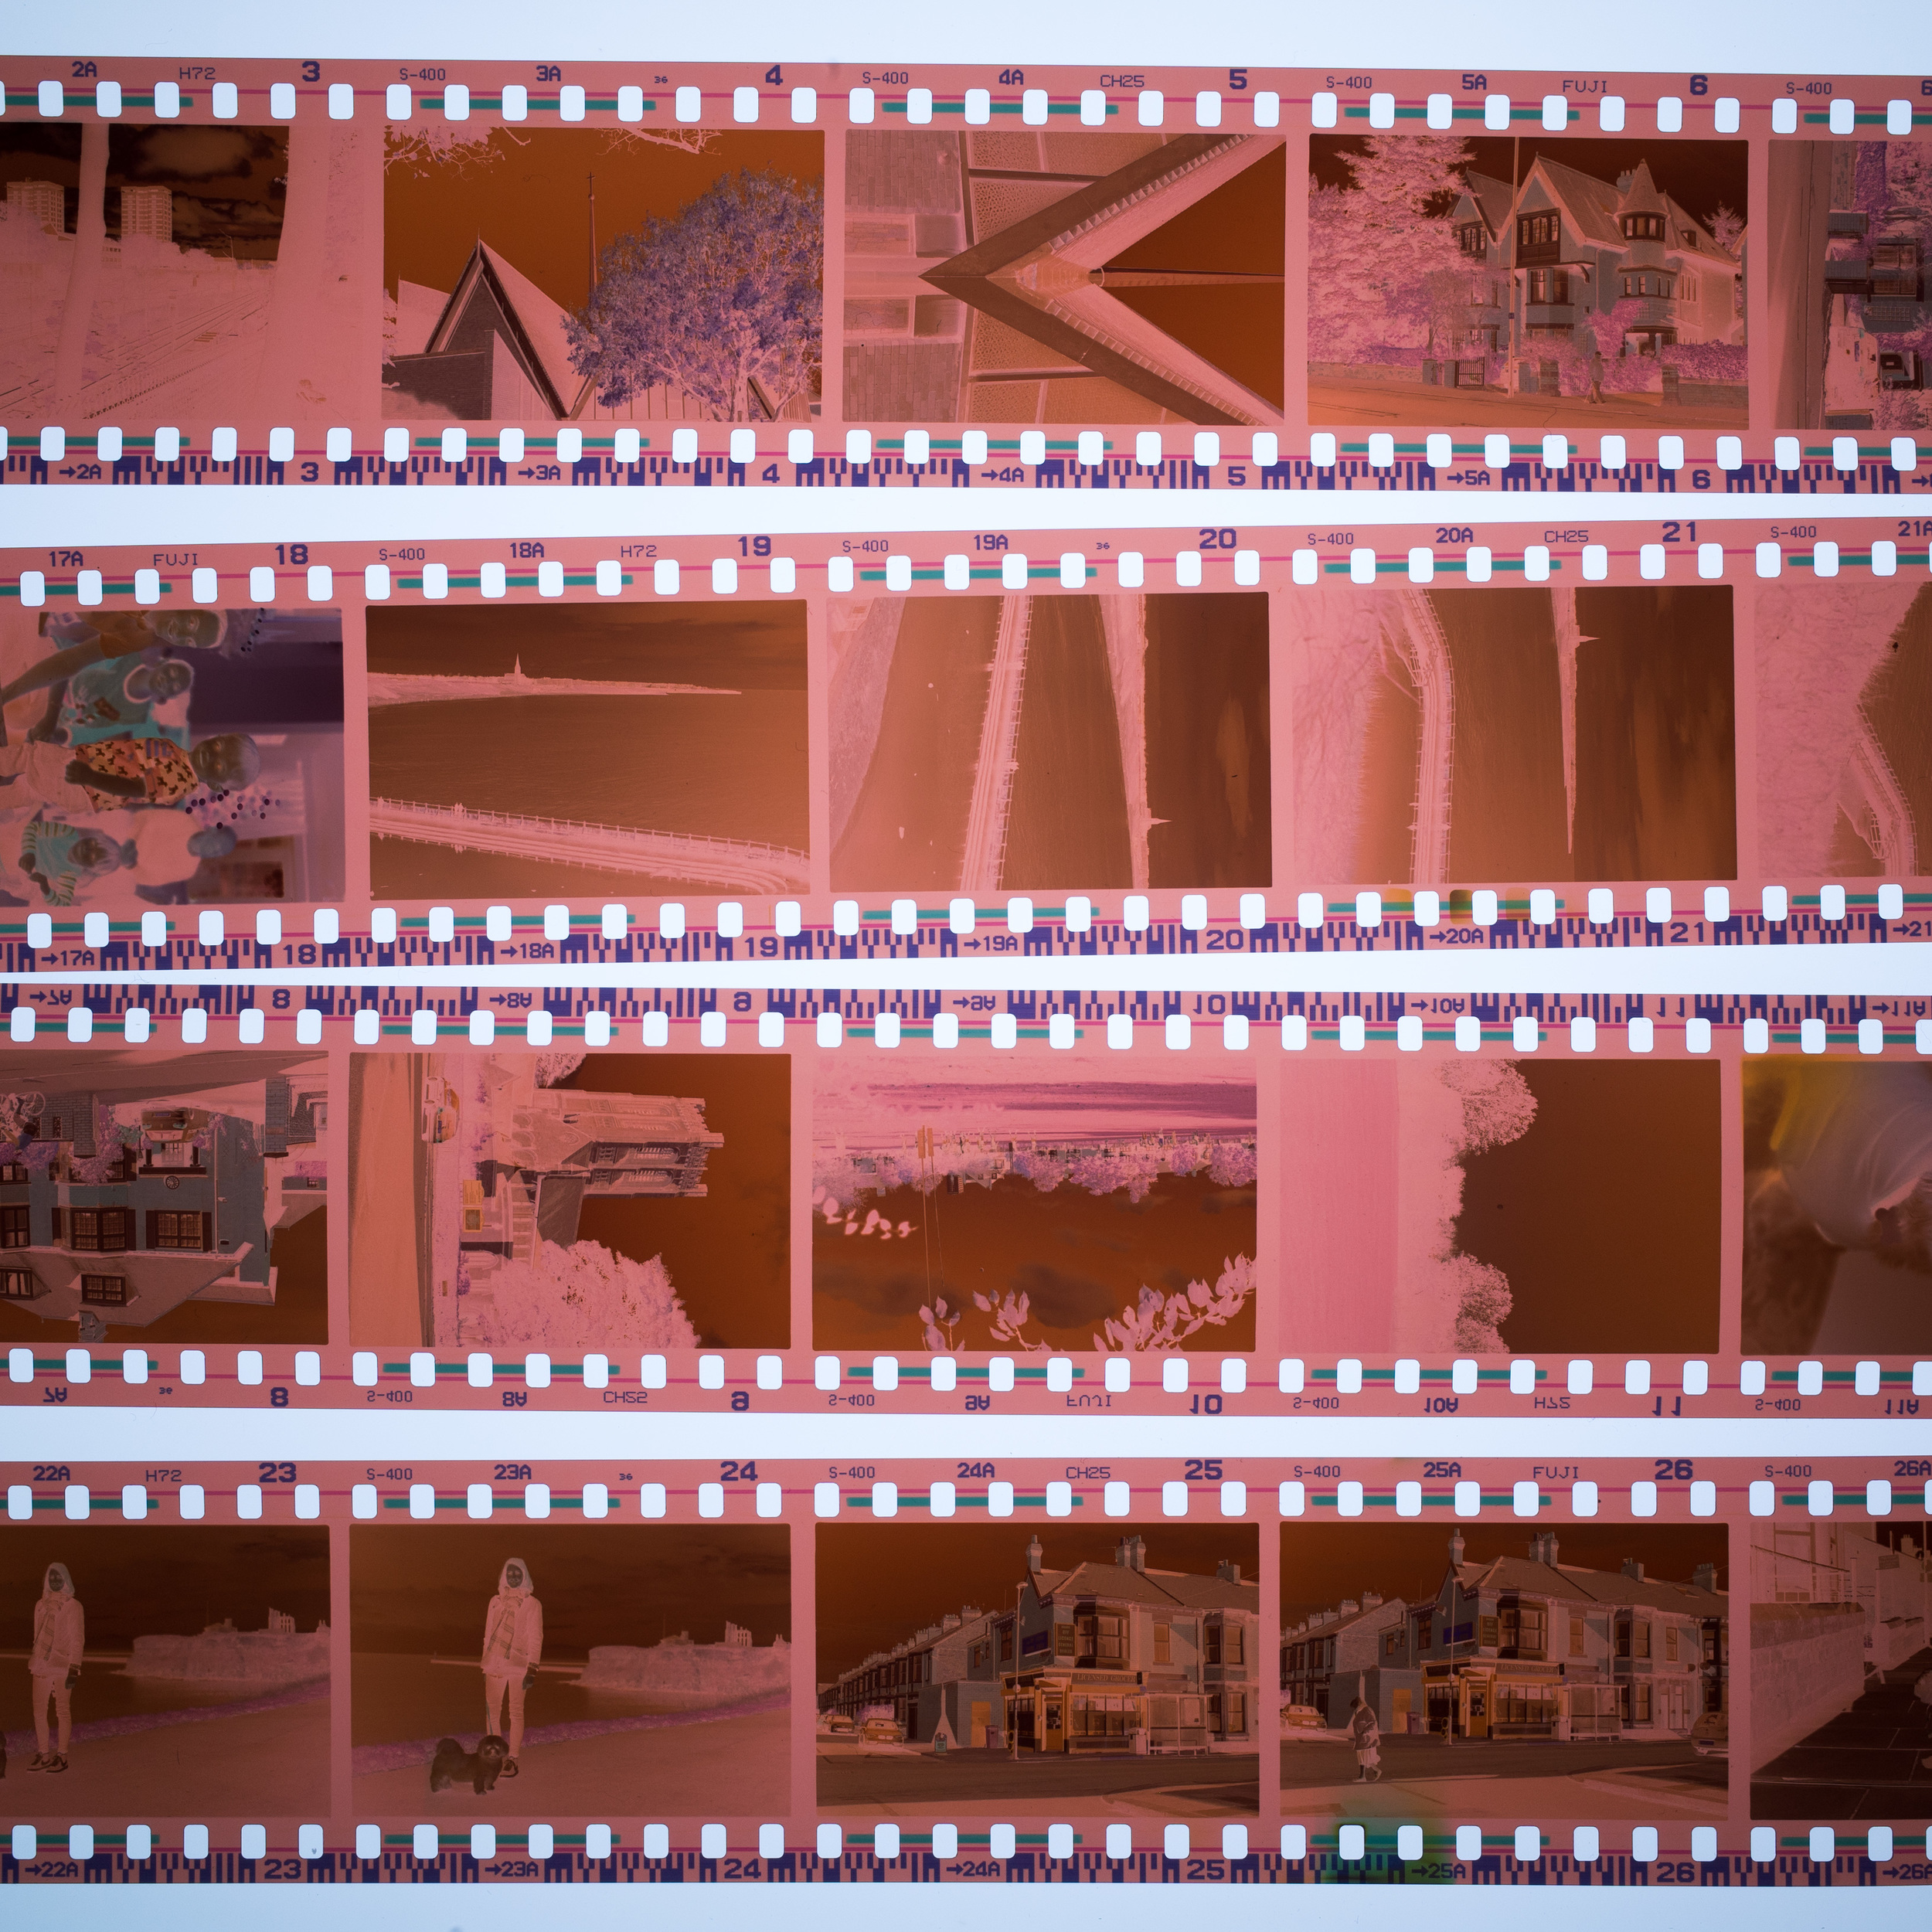
The digital negative file acquired using the DSLR scanning technique.
The final image correctly balanced after editing the digital negative. | Dusk | Fujifilm Superia 400
'Scanning' negatives with the use of a DSLR isn't a new technique and is simply taking a photo of a negative to digitise it. The benefits of this method is that it is accessible to everyone who has a DSLR and results in hight-resolution RAW files that are ideal for editing. The quality is far superior to the images on the CD but unlikely to match that of a good dedicated negative scanner. For now, it's good enough for me.
Example of the image quality achievable with this method of scanning using a Canon 550D and 50mm f1.4 lens. | Walking Heaton Road | Fujifilm Superia 400
In comparison to buying a dedicated scanner it's inexpensive too, provided that you already own a DSLR and suitable lens. The additional peripherals required; macro tubes, slide duplicator and film strip holder cost around £50-60 in total.
If you have a box of old negatives lying around and you've only ever seen them in cheap prints or scanned in low res, I would totally recommend giving this a go to see your images in a new light.
So let's get to it.
Digitising 35mm negatives using a DSLR

What you will need
DSLR camera (Amazon link)
Mid range prime or zoom lens (preferably without a rotating front element)
Slide duplicator lens adaptor (Amazon link)
Film strip holder (Amazon link)
Macro tubes (Amazon link)
Tripod (Amazon link)
Rocket blower (Amazon link)
Good even light source (daylight is fine)
35mm negatives
Also useful to have:
Cotton gloves for handling negatives.
Strobe or flashgun as consistent light source.
Remote shutter release.
Setting up the camera

The slide duplicator, lens and macro tube attached to the camera.
Get your camera locked down on the tripod, you don't want it moving about.
Attach your lens to a suitable macro tube. The macro tube moves the lens forward so that it can focus on much closer things but sacrifices the ability to focus on far things. I use a 21mm tube on a 50mm lens on an APS-C camera which allows the negative to fit in the frame and focus on it.
If you use a lens that is too wide, you will have to crop into your image a lot, reducing your overall image resolution. If you use an lens that is too zoomed in, you might lose the edges of your negative.
If your slide duplicator lens adaptor comes with a "macro lens" like mine did (Polaroid Slide Duplicator), make sure you detach it. Using macro tubes does the same job but without involving a cheap glass/plastic lens that can degrade image quality.
Attach the slide duplicator to the filter threads on the end of your lens. You might need step up/down adapters so that it can attach to your particular lens (Amazon link). Be careful not to over tighten the slide duplicator as I found out myself, it can be a nightmare to remove!
Attach the lens contraption to the camera.
If the end of the slide duplicator is not straight, loosen the small screw on the barrel by hand and rotate the end piece so that it is aligned with the sensor.
Preparing the negatives
Tiny bits of dust show up like crazy when scanning negatives so try to keep the area you are working as free of dust as possible.
Carefully place a strip of negatives into the film strip holder, making sure that each frame is centred without any gaps around the edges. I would recommend using cotton gloves for this as negatives love to attract finger prints too. If you don't have gloves, very carefully handle the negatives by the edges.
Once closed, use the rocket blower on each frame, front and back, to get rid of any dust.
Carefully slide the film strip holder into the slide duplicator, taking care that the images are not facing the wrong way.

Either look through the viewfinder or use LiveView to make sure that the entire negative is lined up in the frame.
Aquire the correct focusing distance either with autofocus or by using LiveView and doing it manually and then set your lens to manual focus to lock it there.
Camera settings
Image Quality
Set the image quality to RAW as we need as much flexibility as possible.
ISO
Set the ISO as low as you can to prevent any extra grain.
Aperture
Set the aperture towards the small end to keep things in focus. I go with f9.
White Balance
As the negative has an orange tint, I select tungsten (3200k) to counter it. You could go with a custom WB but I find that 3200k is adequate.
Shutter Speed
Shutter speed will vary depending on the amount of light you have available.
Exposure Metering
Centre weighted metering works well as it ignores the black frame of the film holder.
Taking the photo
As with any photo, we're looking to get a correct exposure without any shadow or highlight clipping. Putting the camera in Aperture Priority mode might work fine but I prefer the control and consistency of Manual Mode.
Point the camera towards the light source. There is a diffusion panel on the back of the side duplicator to help spread light from smaller sources but a larger source will ensure an even exposure. White (sun light) or colder (blue) light work well as they counter the orange tint of the negative. With warmer light sources, it's easier to blow out the red channel which is something that we want to avoid.
I use a strobe as my light source as it's consistent and bright enough to use a fast shutter speed but natural light coming through a good window will work just as well.

Using the RGB histogram to preview the image. The spike on the left of the histogram is the black film holder so it's okay that it's clipped. The data for the negative is contained towards the centre of the graph and is not clipped on either side which is what we are after.
It's fine to use a dim light source and a long exposure to capture the images too. When doing so, to minimise camera shake, you should use a remote shutter release or the countdown timer built into the camera.
I have used the LED flash from my phone before as a light source and it worked well but if you choose to do the same, do so at your own peril. I don't think it's designed to be on for extended periods of time.
Check your shots using the RGB histogram to make sure that none of the channels are clipping.
Note: There will be clipping in the shadows due to the black frame of the film holder but it's clear to see where it dips and the histogram for the negative begins. To be safe you can increase the exposure by a couple of stops whilst making sure the data stays within the graph area on the right side.
Keep an eye on the red channel especially as the highlights are easily blown out due to the colour of the negative.
Once you have a good exposure, slide the film holder along, line up the next frame and take the next shot. The camera settings shouldn't need to change much, if at all.
If you get into a good rhythm, you should be able to scan the negatives quite quickly, leaving you with lots of RAW negative files ripe for editing.
Next Step: Editing the RAW negatives
Digital negative RAW file from camera.
The digital negative inverted to create a positive image which has a strong cyan colour cast.
The positive image balanced and cropped to create the final image. | Shadows | Fuijifilm Superia 400
Once you have a Digital Negative RAW file, learn how to colour correct it whilst keeping the film’s natural colours intact by reading the follow-up blog post:
Leave any questions in the comments section below and I'll do my best to answer them.


Ant Tran is product and lifestyle photographer. Currently working at END.
Tutorial